Setting up your own custom remote desktop for free with rustdesk
Teamviewer and Anydesk have been a monopoly in the desktop remote control space for a while. This might however change with the conversion of Rustdesk a lesser-known remote desktop application from proprietary to open source.
The ability to remotely access personal computers is useful for any IT administrator. Remotely accessing computers enables IT administrators to diagnose malfunctioning computers or offer assistance to the user without being physically there.
There are a lot of remote desktop applications that offer remote access to computers. The most popular remote desktop applications are Teamviewer and Anydesk. Teamviewer and Anydesk are however not free. If you would like to access 1 or 2 computers just for a few minutes a day, Teamviewer and Anydesk would be the best choice. If you however would like to access a remote computer over an extended time using Anydesk or Teamviewer you have to pay for a subscription. Access over an extended time on Teamviewer or Anydesk is limited by device blocks from using their remote desktop applications.
Teamviewer and Anydesk have been a monopoly in the desktop remote control space for a while. This might however change with the conversion of Rustdesk a lesser-known remote desktop application from proprietary to open source. At the moment Rustdesk offers fewer functionalities compared to its predecessors Teamviewer and Anydesk however it does offer basic functionalities and is usable. This can however take a turnaround with the Rustdesk being open source, contributions can be made by the open-source community to implement missing functionalities.
Rustdesk unlike TeamViewer or AnyDesk does not come with any limitations and can be used over an extended time. If you don't want to use their public servers you can deploy Rustdesk on your custom server.
In this guide, we will go through how to set up your own custom Rustdesk remote desktop server on Debian.
We'll also cover how to map your devices on the local network to use the Debian server to discover each other and remotely connect.
This is for the sake of simplicity and understanding, in a production environment, when deploying your remote desktop server to a VM in either GCP, AWS, Azure, or DigitalOceans, we will need to use the public IP and would need to enable ports.
Below are ports that Rustdesk uses and requires them enabled:
- TCP - 21115:21119
- TCP - 8000
- UDP- 21116
However, using a custom remote desktop server offers privacy, security, and speed. If your location is not close to one of the regions where Rustdesk servers are freely available your connection might be slow. This is where a custom remote desktop server comes to hand as you can set it up to a location close to you.
At the time of writing, Rustdesk has servers in:
| Location | Vendor | Specification |
|---|---|---|
| Seoul | AWS lightsail | 1 vCPU / 0.5GB RAM |
| Germany | Hetzner | 2 vCPU / 4GB RAM |
| Germany | Codext | 4 vCPU / 8GB RAM |
| Finland (Helsinki) | 0x101 Cyber Security | 4 vCPU / 8GB RAM |
| USA (Ashburn) | 0x101 Cyber Security | 4 vCPU / 8GB RAM |
| Ukraine (Kyiv) | dc.volia (2VM) | 2 vCPU / 4GB RAM |
Installing Rustdesk Remote Desktop Server on Debian/Ubuntu or other Linux
Download the Rustdesk installation script.
wget https://raw.githubusercontent.com/dinger1986/rustdeskinstall/master/install.shGive the downloaded file executable permission.
chmod +x install.shExecute Rustdesk Installation script
./install.sh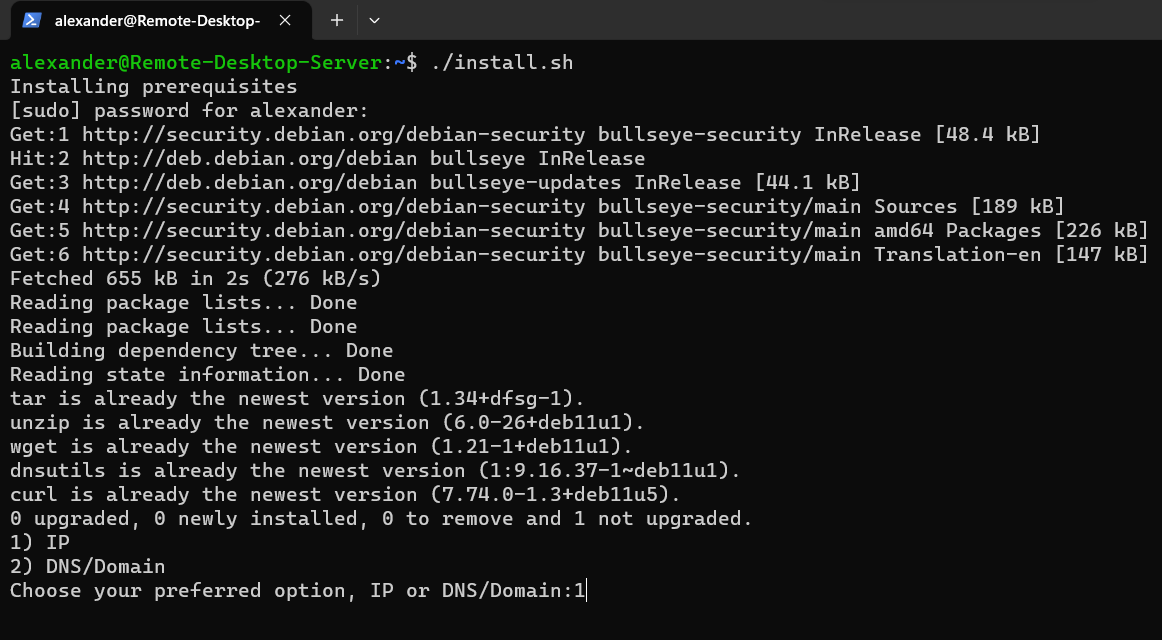
After installation, the installer displays your IP and public key. You should copy and save your public key for use later.
NB: The installer usually displays the public IP of the server as the default IP, this is useful in production environments i.e. GCP, AWS, Azure, and Digitaloceans.
For our testing case, however, we will use the local IP to discover Rustdesk devices since our Debian/Ubuntu server is a VM.
Configuring Rustdesk client to use custom Rustdesk remote desktop server
Firstly download and install the Rustdesk client from the official website.
After installing Rustdesk change the relay server settings to use our custom Rustdesk server as a relay server.
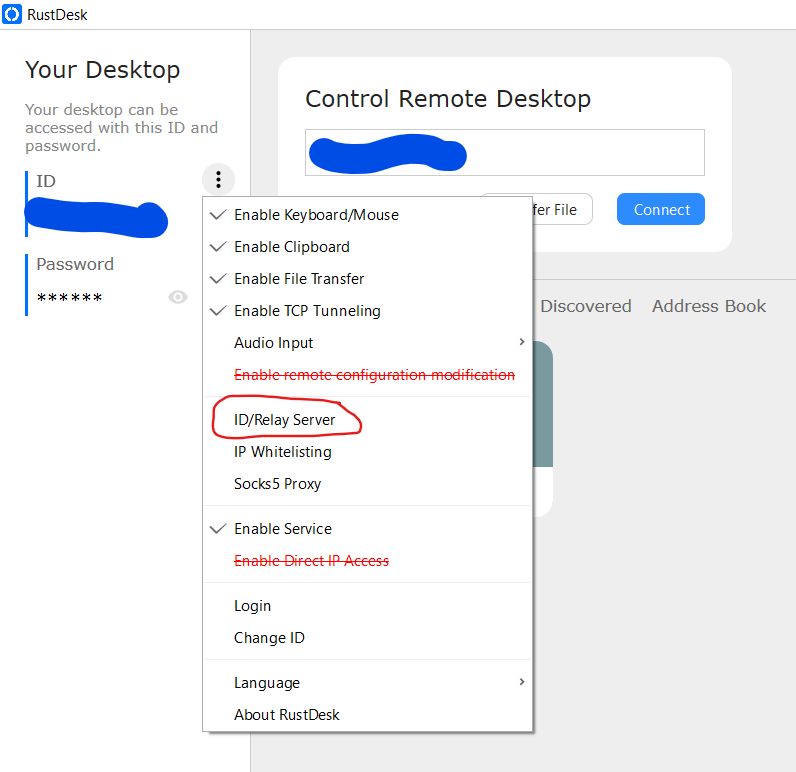
In my case, the server's local IP was 192.168.123.138 so we'll go ahead and use that.
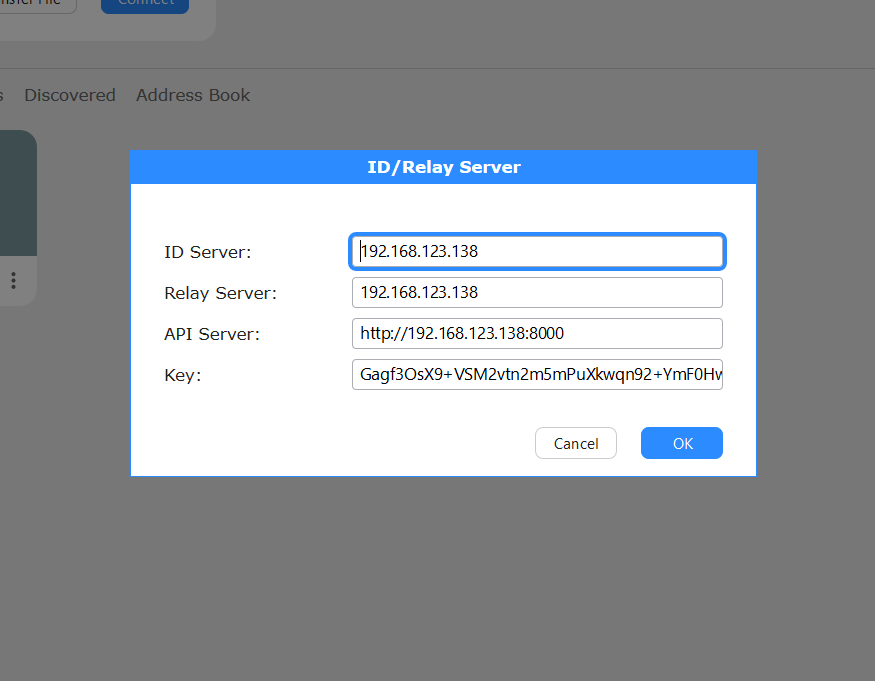
After you are done press ok.
Repeat the process for the next personal computer you want to access remotely.
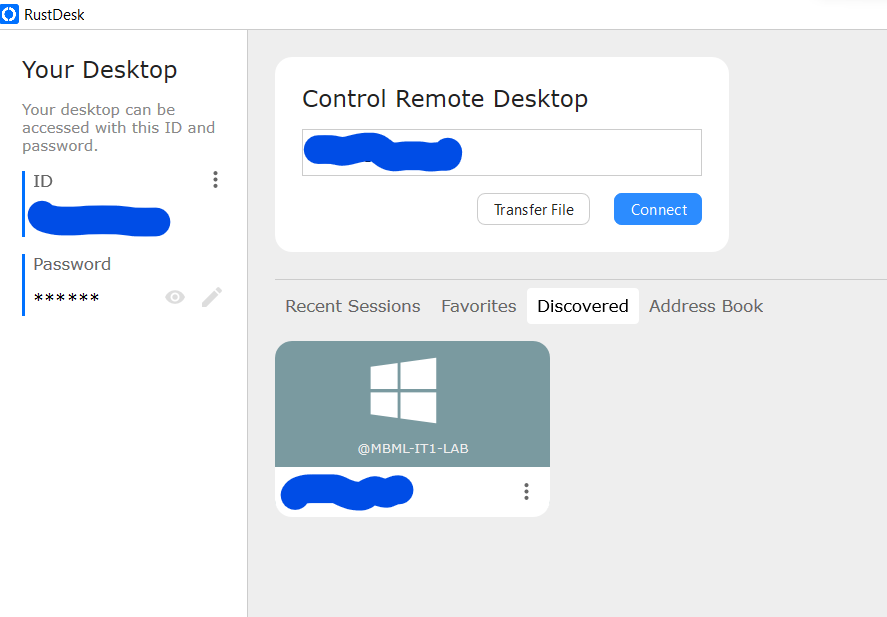
Once you are done devices using the relay server will be available in the "Discovered" section and you should be able to remote access to them.
As long as you know their passwords which can be viewed and changed in the left sidebar.
Rustdesk transfer files
You can easily transfer files to a remote PC using Rustdesk when you right-click on the remote desktop settings.
Conclusion
Rustdesk has a long way to go before it is the go-to remote desktop software for everyone. However, I do love the stride they have taken by providing free remote desktop software for everyone. The alternatives such as Teamviewer and Anydesk charge a shit ton of money to access such services. Rustdesk is created using Rust a low-level programming language and is not bloated with tones of features you might never use, making Rustdesk a lightweight and highly performant software compared to Anydesk and TeamViewer.
More Useful Resources
 RustDesk

