Nodejs web sockets with Socket.io
Socket.io is a library that allows simultaneous communication between client and server.

Web socket is a communication protocol that allows simultaneous communication between the server and the client. Once a connection is established the connection is kept alive until either the client or the server terminates the connection. This is usually useful when creating real-time applications.
Simultaneous communication between the server and the client is not possible in regular HTTP. HTTP protocol only allows sending and receiving between the client and the server.
Unlike the HTTP protocol which utilize http:// and https:// web sockets use their own convention ws:// and wss:// respectively.
NB: Even though Socket.io library utilizes web sockets it is not a replacement for web sockets. This is because Socket.io adds some metadata on client and server during communication without them the connection is not usually established.
Socket.IO
Socket.io is a library that allows simultaneous communication between client and server using web sockets. When web sockets fail Socket.io switches to HTTP long polling ensuring the data is sent regardless. In cases of complete failure Socket.io does automatic re-connection.
What's HTTP long Polling
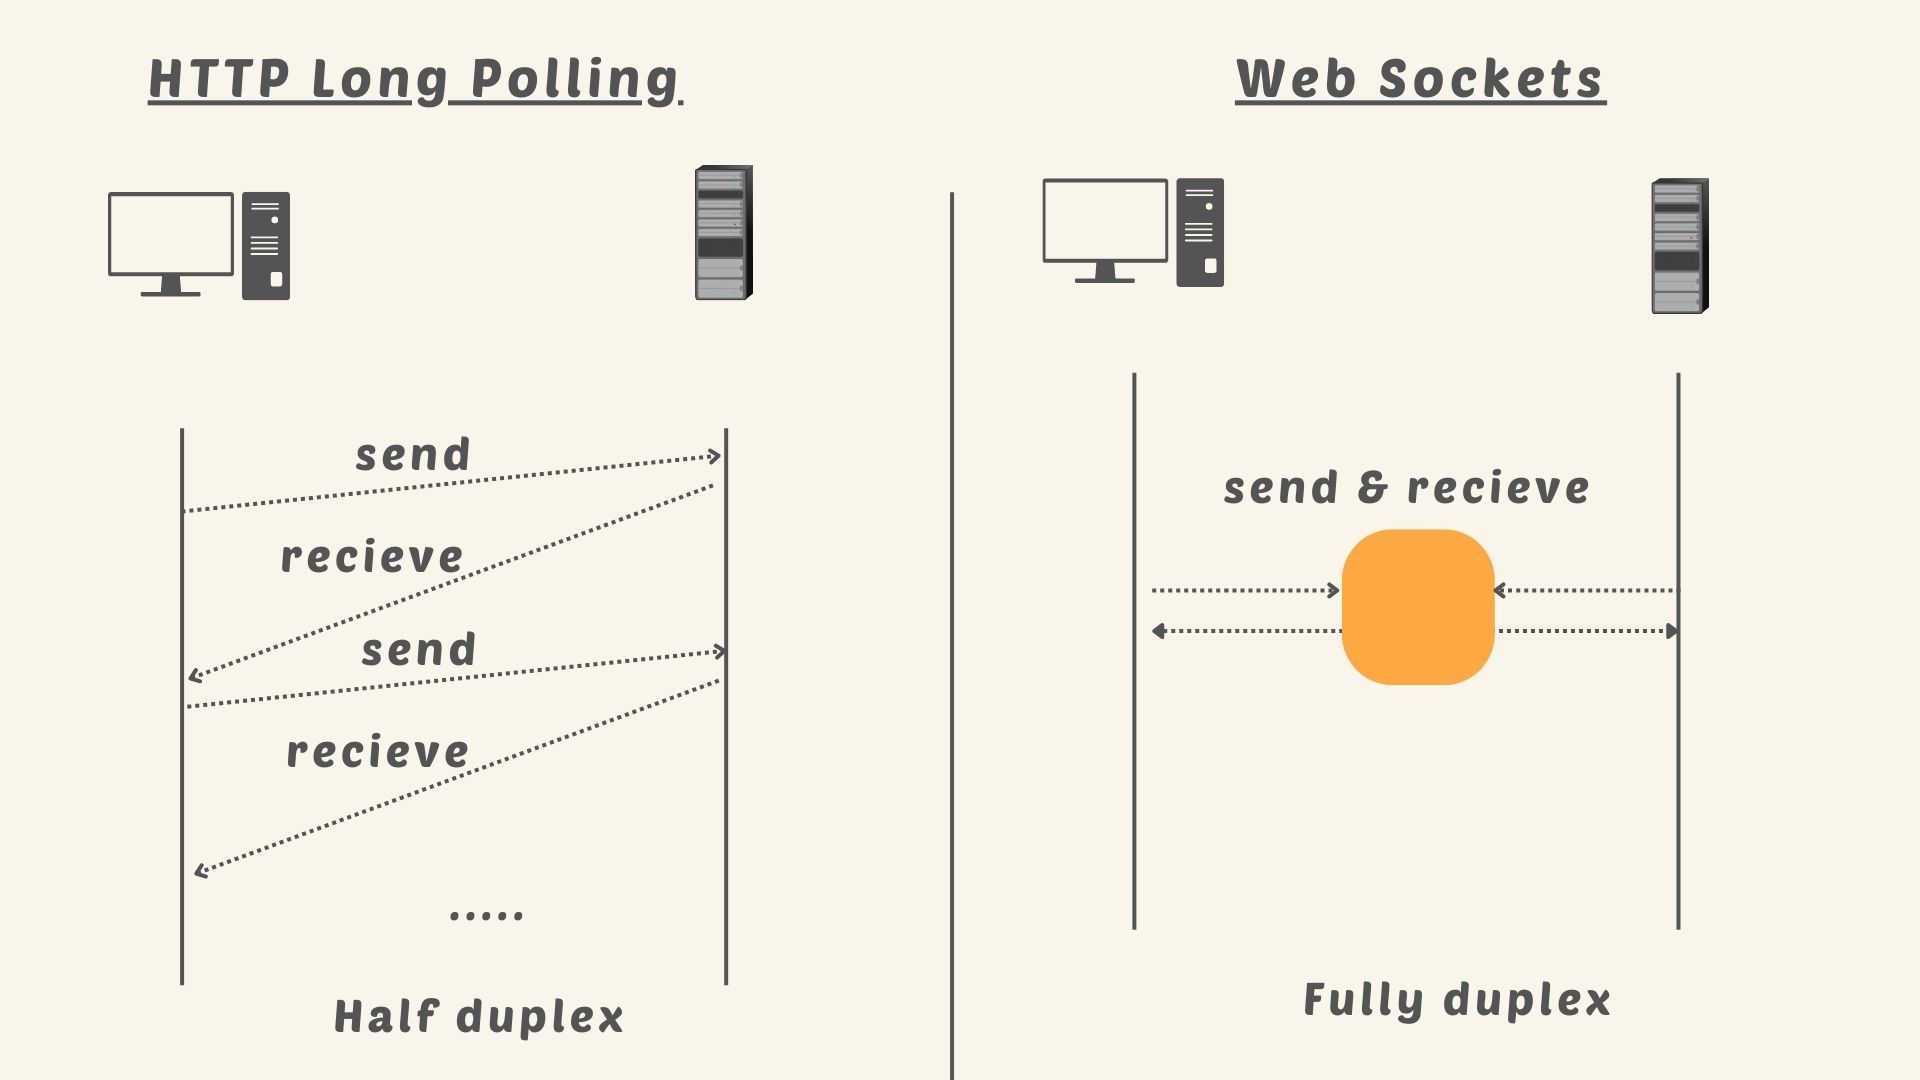
HTTP long polling keeps the HTTP connection alive until requested resources is available. After the resource is delivered the connection is terminated and the client starts another connection. Due to the nature of http protocol (send and receive) even though long pooling is usually easy to implement it comes with latency overhead.
Web sockets offers fully duplex communication between server and client where as HTTP long polling communication is half duplex.
Getting Started with Socket.IO - Chat App
We'll demonstrate Socket.io by building a simple real-time chat app that utilizes Socket.io using express server.
Setting up Package.json
package.json is the package management file for npm.
- Create chat-app folder
- Add a
package.jsonfile containing the contents below:
{
  "name": "chat-app",
  "version": "0.0.1",
  "description": "socket.io chat app",
  "dependencies": {}
}Installing necessary dependencies
Run the following commands to install Express and Socket.io.
npm install express@4npm install socket.ioExpress server
Now create a file index.js
Add the below content.
const app = require('express')();
const http = require('http').Server(app);
const io = require('socket.io')(http);
const port = process.env.PORT || 3000;

app.get('/', (req, res) => {
  res.sendFile(__dirname + '/index.html');
});

// Socket io listening
io.on('connection', (socket) => {
  socket.on('chat message', msg => {
    io.emit('chat message', msg);
  });
});

http.listen(port, () => {
  console.log(`Socket.IO server running at http://localhost:${port}/`);
});We use socket's.io on() to listen for socket connections. When a connection is established we listen for chat-message data upon receiving the chat-message we emit an event named chat-message using socket's.io emit() which can be listened on, on the client and rendered.
Client
This is the section the user interacts with. If you take a closer look we serve it as index.html.
Create index.html file
Add below content.
<!DOCTYPE html>
<html>
  <head>
    <title>Socket.IO chat</title>
    <style>
      body { margin: 0; padding-bottom: 3rem; font-family: -apple-system, BlinkMacSystemFont, "Segoe UI", Roboto, Helvetica, Arial, sans-serif; }

      #form { background: rgba(0, 0, 0, 0.15); padding: 0.25rem; position: fixed; bottom: 0; left: 0; right: 0; display: flex; height: 3rem; box-sizing: border-box; backdrop-filter: blur(10px); }
      #input { border: none; padding: 0 1rem; flex-grow: 1; border-radius: 2rem; margin: 0.25rem; }
      #input:focus { outline: none; }
      #form > button { background: #333; border: none; padding: 0 1rem; margin: 0.25rem; border-radius: 3px; outline: none; color: #fff; }

      #messages { list-style-type: none; margin: 0; padding: 0; }
      #messages > li { padding: 0.5rem 1rem; }
      #messages > li:nth-child(odd) { background: #efefef; }
    </style>
  </head>
  <body>
    <ul id="messages"></ul>
    <form id="form" action="">
      <input id="input" autocomplete="off" /><button>Send</button>
    </form>
    <script src="/socket.io/socket.io.js"></script>

    <script>
      var socket = io();

      var messages = document.getElementById('messages');
      var form = document.getElementById('form');
      var input = document.getElementById('input');

      form.addEventListener('submit', function(e) {
        e.preventDefault();
        if (input.value) {
          socket.emit('chat message', input.value);
          input.value = '';
        }
      });

      socket.on('chat message', function(msg) {
        var item = document.createElement('li');
        item.textContent = msg;
        messages.appendChild(item);
        window.scrollTo(0, document.body.scrollHeight);
      });
    </script>
  </body>
</html>
In the client section we have to include socket.io library on the html "<script src="/socket.io/socket.io.js"></script> " in order for socket.io to work.We then initialize socket.io using var socket = io(); . After initialization we can use socket.io in our script.
We add an event listener so that when the user clicks send message on the form the message is caught and socket.io emits an event chat-message with its contents. The next block of code uses socket's.io on() to listen for chat-message event and append its contents to the html.
Finally
Run: node index.js
On your browser navigate to : http:\\localhost:3000 to have a look at your simple chat app.